- Guides, tutorials and docs
- Learning the Woovebox
- The very basics
- Quick start tutorial and video
- Tempo and BPM
- Tracks
- Patterns
- Live pattern recording
- Conditional triggering and modification
- Chords
- Arpeggios
- Scales and modes
- Genres
- Patches and Presets
- Sound design
- Paraphonic parts
- Multi-instrument mode
- Risers, fallers, sweeps & ear candy
- Live mode
- Song mode
- Full song writing
- Sampler & vocoder
- Sidechaining, gating, ducking and compression
- Mastering
- Lo-fi & vintage analog and digital emulation
- Randomization
- Hall effect sensor playing
- Advanced techniques
- Undo
- Boot modes
- MIDI, Sync and connecting other gear
- Remote control expander mode
- Wireless MIDI over Bluetooth
- Battery and charging
- Hardware quirks and limitations
- Understanding DSP load
- Looking after your Woovebox
- Firmware updates
- Tracks
- Pages
Pages
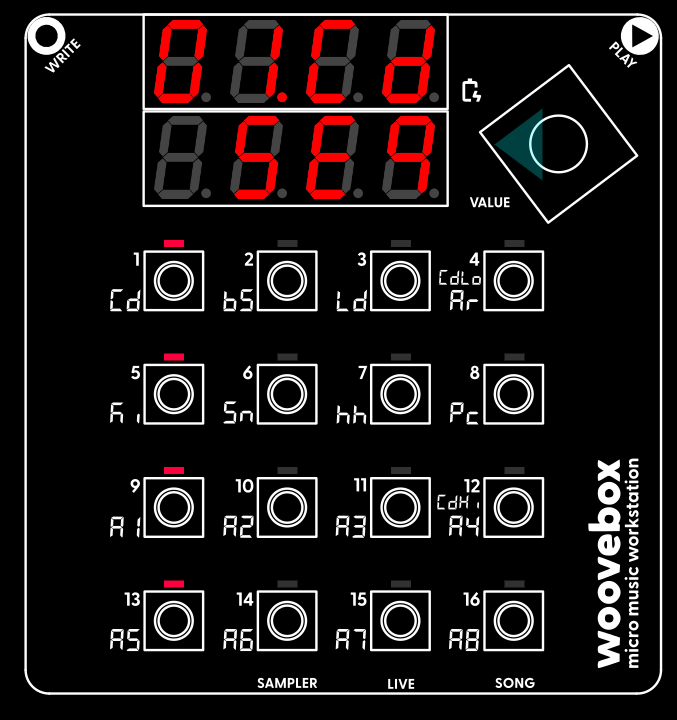
Each track has multiple pages, where different aspects of the track can be modified. These pages are accessed by turning the value knob left or right. Turning the value knob to the right will scroll through the other pages, covering everything from sound design to side chaining and patch presets.
Sequencer
The "left-most" page is always the Sequencer ("Seq") page, where you can edit the steps of the currently selected pattern. This is the most important page where a pattern's steps can be modified in detail. This page shows which steps currently have notes assigned to them via the LED grid, whereas most other pages show which 1-16 buttons have parameters behind them that you can modify.
Note that in pages other than the Sequencer ("Seq") pages, holding down write temporarily reveals which steps currently have notes assigned to them, as if you were on the Sequencer ("Seq") page. Letting go of write will once again show which 1-16 buttons have parameters behind them that you can modify.
Patch (and selecting presets)
The "right-most" page is the Patch ("Pach") page, where you can select preset patches and - through the context menu - perform things like backing up patches, or copying them to other tracks.
Holding any button with lit up LED and then turning the value knob, will load a preset. Note that you can, for example, load a Ki (kick category) patch onto, say your 3/Ld/Lead track if you so wish.
You may also be interested in...
- Set song BPM (under Quick start tutorial and video)
Still holding the 1-16 button, turn the value knob left or right to change the parameter or setting's value.
- 8. Pt.rS Playthrough Counter Reset Behavior (under Patterns)
'Awys ' (always); playthrough counters are always reset when this pattern number is encountered, including as part of a pattern chain.
- Using a sample kit (under Using samples and kits in your songs)
To quickly and conveniently create a sample kit patch out of a kit; In the sampler, select the kit you want to use ("US.01"-"US.16").
- Using a single sample chromatically (under Using samples and kits in your songs)
Exit the sampler by selecting the track to work on (value + 2/bS - 16/A8) where you want the sample kit to go.
- 9. CM.Th Compressor Threshold (under Dynamics)
Specifies a threshold (0-100) below which the track's compressor should kick in.
- Guides, tutorials and docs
- Learning the Woovebox
- The very basics
- Quick start tutorial and video
- Tempo and BPM
- Tracks
- Patterns
- Live pattern recording
- Conditional triggering and modification
- Chords
- Arpeggios
- Scales and modes
- Genres
- Patches and Presets
- Sound design
- Paraphonic parts
- Multi-instrument mode
- Risers, fallers, sweeps & ear candy
- Live mode
- Song mode
- Full song writing
- Sampler & vocoder
- Sidechaining, gating, ducking and compression
- Mastering
- Lo-fi & vintage analog and digital emulation
- Randomization
- Hall effect sensor playing
- Advanced techniques
- Undo
- Boot modes
- MIDI, Sync and connecting other gear
- Remote control expander mode
- Wireless MIDI over Bluetooth
- Battery and charging
- Hardware quirks and limitations
- Understanding DSP load
- Looking after your Woovebox
- Firmware updates