Quick start tutorial and video
- Guides, tutorials and docs
- Quick start tutorial and video
- Guides, tutorials and docs
- Learning the Woovebox
- The very basics
- Quick start tutorial and video
- Tempo and BPM
- Tracks
- Patterns
- Live pattern recording
- Conditional triggering and modification
- Chords
- Arpeggios
- Scales and modes
- Genres
- Patches and Presets
- Sound design
- Paraphonic parts
- Multi-instrument mode
- Risers, fallers, sweeps & ear candy
- Live mode
- Song mode
- Full song writing
- Sampler & vocoder
- Sidechaining, gating, ducking and compression
- Mastering
- Lo-fi & vintage analog and digital emulation
- Randomization
- Hall effect sensor playing
- Advanced techniques
- Undo
- Boot modes
- MIDI, Sync and connecting other gear
- Remote control expander mode
- Wireless MIDI over Bluetooth
- Battery and charging
- Hardware quirks and limitations
- Understanding DSP load
- Looking after your Woovebox
- Firmware updates
This is a super quick tutorial for making your first complete song, demonstrating a full workflow, without going too deep just yet.
Boot up

Turn on your Woovebox without touching the write or play touch buttons (as their sensitivity is calibrated during boot).
Once your Woovebox has booted up, you will be dropped into Song ("SG") mode.
The song number you last worked on, is automatically restored ("SG.01" through "SG.16"). The chord (Cd) track will play a chord/chime, to let you know boot up has completed. This chime also gives you an audible identifier of the song that is loaded (as you may recognize the timbre of the instrument).
Note that, when you switch away from Song mode, you can return to Song mode at any time, by holding the value button down and then short-pressing ("short-pressing" meaning, holding down for less than one second) 16/A8/SONG.
If you accidentally scrolled past the "GLob" or "EFct" pages and the display reads "Fr.xx" (fragment number xx) or "DJ.xx" (DJ FX for fragment xx), you can use the value knob (turn left) to scroll back to to the "SG.xx", "GLob" (or Efct) pages.
Set output volume

Hold play and turn the value knob left or right to set the output volume to a comfortable level. Press 1-16 to audition a sound to help you hear the difference in output levels. Your preferred output level will be saved on the next auto save event. You can adjust the output volume like this anywhere in the interface.
Select and initialize a song
If you wish to select a different song to work on, you can do so by holding play and pressing 1-16 to select song 1 through 16.
If you wish to start over with the currently selected song by resetting and clearing it, you can do so through the context menu;
- Hold write and short-press the value knob to cycle through the options until you find the "Init rand" menu item.
- Once found, long-press ("long-pressing" meaning, holding down for more than one second) the value knob to action the item. The song will be cleared and your Woovebox will report "Init oK".
- Release write to exit the context menu.
- All patterns are cleared, and tracks are initialized with random (but typically appropriate) presets to get you started quickly.
Note that these context menus are available in a number of different places around the Woovebox UI, and they all work in the same way. Please take note of how to use them, as they often hide handy features, functions and short-cuts.
Set song BPM
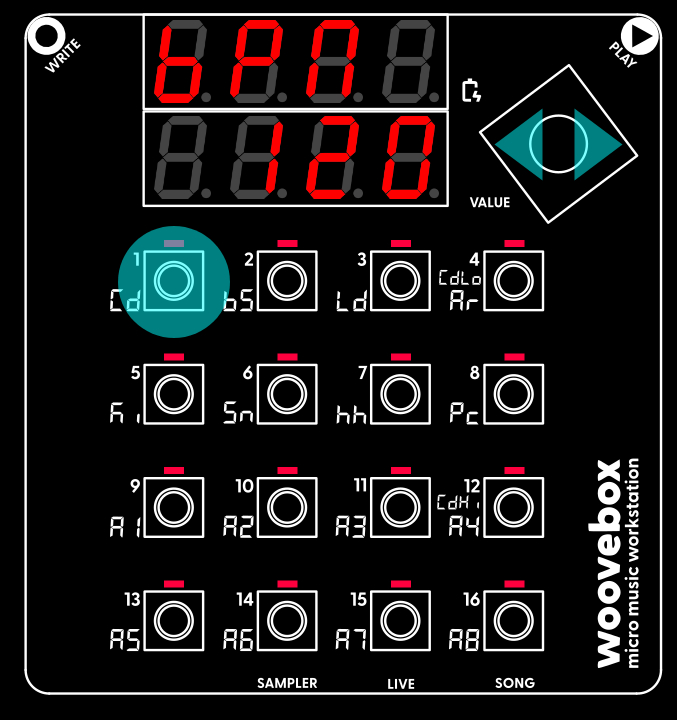
Set your new song's tempo (in beats-per-minute or "BPM"). In this case, the BPM setting lives under the 1/Cd button in Song (Global/"Glob") mode. To change a parameter or setting like "BPM";
- Hold the button 1-16 that corresponds to a parameter or setting; if a button has a lit up LED, then it has a parameter you can change.
- Still holding the 1-16 button, turn the value knob left or right to change the parameter or setting's value.
To discover more parameters and the values they are set to, simply short-press any 1-16 buttons that have their corresponding LED lit. Any buttons that do not have their LED lit, do not have a setting or parameter associated with them. To get a longer, 8-character description of a parameter or setting, long-press the button.
Changing parameters like this is done the exact same way across the entire UI. It provides you up to 16 parameters to change at once and avoids menu-diving.
For now, it is enough to know that your BPM setting flows through to the tempo and speed of many things. From the delay effects to LFO rates, and even automatic time stretching of samples; a change in BPM will never throw off any tempo-based aspects of your song. Everything adjusts automatically.
Switch to the kick drum track
Let's program our first sounds.
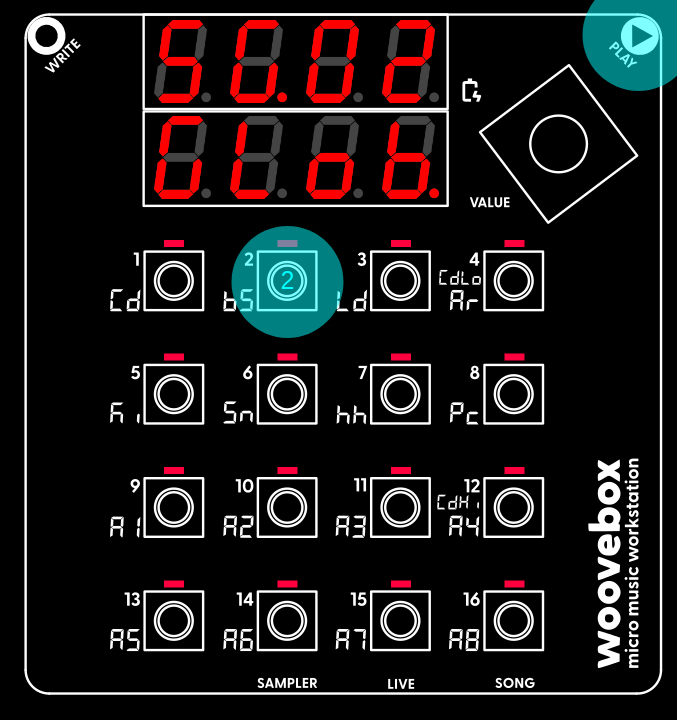
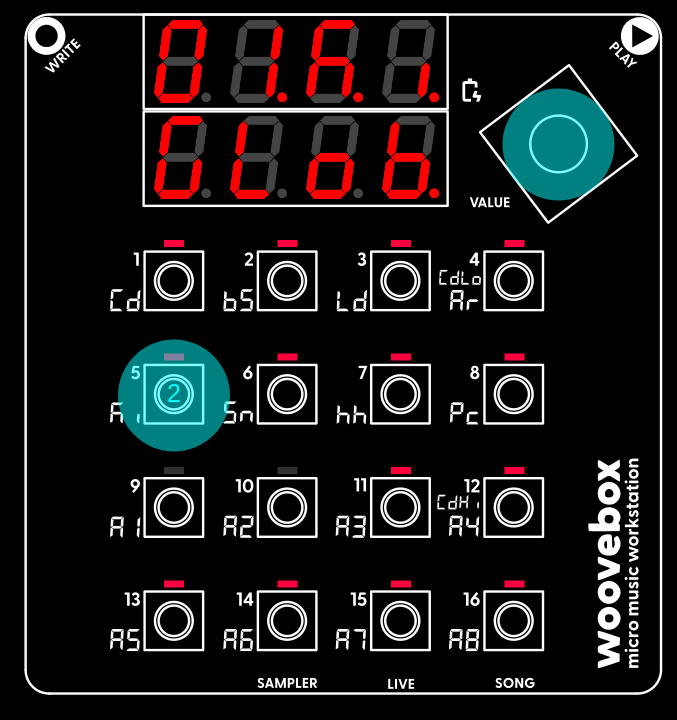
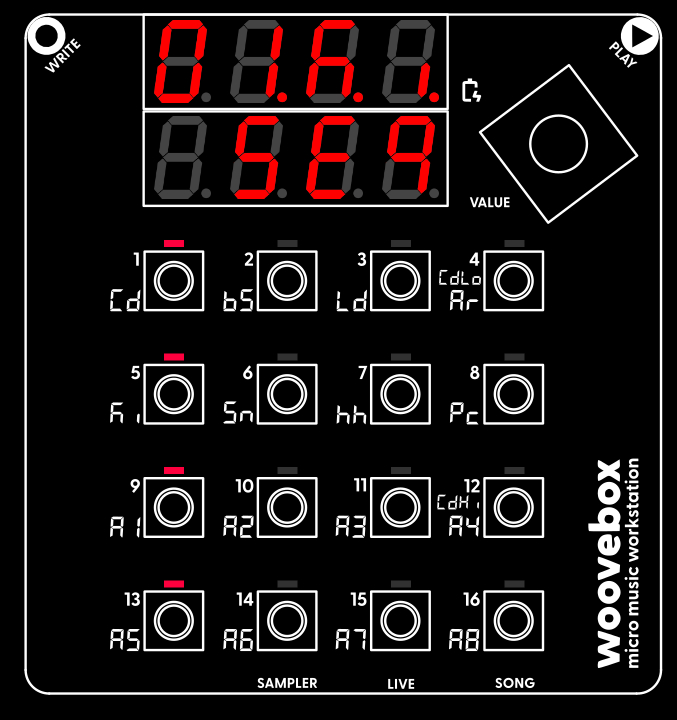
Hold the value button and short-press the 5/Ki button. This switches to the kick drum (Ki) track. By default, it switches to pattern 01 of the track and shows the first page of the track; the sequencer ("SEq") page.
In the same way, you can switch to other tracks (hold value + short-press 1/Cd-13/A5), to the Sampler (hold value + short-press 14/A6/SAMPLER), to Live mode (hold value + short-press15/A7/LIVE), or back to Song mode (hold value + short-press16/A8/SONG) where we were before. Track A6-A8 are accessible by holding value + long-pressing (instead of short-pressing!) 14/A6-16/A8, for a total of 16 tracks.
Now, on the Ki track, playing key 1-16 will sound variations of the currently selected kick drum patch.
If you don't like the current kick drums, you can select another preset on the patch ("Pach") page. To do so, turn the value knob to the right until you find the last page ("Pach"). Then, just like we did when setting the song's BPM before, hold one of the keys with lit up LEDs and turn they knob to select a different "setting" (preset). Kick presets live under the 5/Ki button, but you are free to select, say, a Lead (3/Ld) preset on the kick track if you wish. You may even randomize a brand new patch through the context menu ("rand Pach").
Now return to track's sequencer("SEq") page. There is a convenient shortcut to the "Seq" page; on any page other than the "Seq" page, short-press the value knob. Short-press the value knob again to quickly go back to the page you came from. This shortcut allows you to quickly flip back and forth between the "Seq" page and some other page. Give it a try.
Know that if you're new to music production or sound design, you can mostly just ignore the pages between the "SEq" page and the "Pach" page for now. Just have fun with the basics first!
Program a kick drum

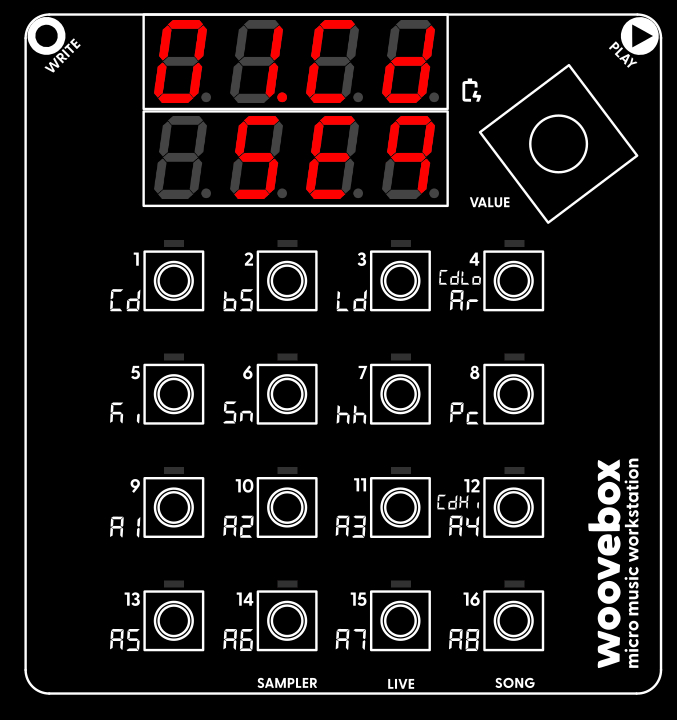
Make sure you're on the sequencer page ("Seq" ) of the kick track's pattern 01 ("01.Ki SEq"). The sequencer ("SEq") page is where events (notes, chords, sample triggers) are added, edited or deleted.
Press play to start playing our empty kick drum track pattern. You will hear nothing right now, but while playing, you will see a blinking "play head" to indicate the position, running from left to right, top to bottom. As your Woovebox steps through the pattern, any steps that the play head encounters that contain programmed kick drum (LED lit up) are played back. Any steps that do not contain a kick drum (LED off) are ignored at that moment in time. Press play again to stop playback.
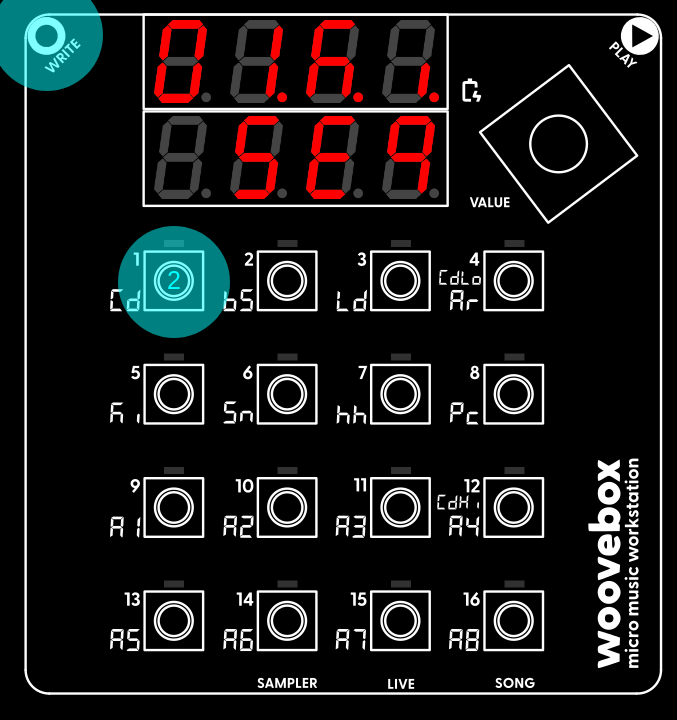
Right now, no kick drums are recorded at all, so playing the pattern back will not produce any sound; let's change that. Program a simple four-to-the floor pattern like so;
- Press any of the 1-16 keys to audition the kick drum you want to program. Depending on the selected kick drum patch, the kick drum may sound different depending on the key you press.
- Once you auditioned a kick drum you like;
- hold write and short-press key 1
- still holding write, short-press key 5
- still holding write, short-press key 9
- and still holding write, short-press key 13.
You have now programmed your chosen kick drum sound onto steps 1, 5, 9 and 13; a standard "four-to-the-floor" pattern.
If you made a mistake and wish to delete a kick drum from a step, simply hold write and short-press the key corresponding to the step (LED lit up) you wish to clear (LED no longer lit up).
Now press play to hear your kick drum pattern being played back to you. Press play again to stop the playback. You may have also noticed that pressing play caused your song to be automatically saved ("SAVE xxx", where xxx is the current battery level %).
Feel free, of course, to add or remove kick drums as you please.
Using the randomizer
If you lack inspiration or need to get something going quickly, your Woovebox comes with an "intelligent" randomization feature. On the "SEq" page, choose and action the "rand Pttn" context menu option. Your Woovebox will now create a random pattern that fits the intended behavior ("bEhv" under 7/hh on the track's "Glob" page) of the track. In this case it will provide you with a plausible kick pattern, but in case of other track behaviors, it will provide you with chords, melodies, basslines, etc. as appropriate. For more information, see the randomization section.
Switch to the chord track
Just like we did for the kick drum, hold the value button and short-press the 1/Cd button to switch to the chord (Cd) track.
The use of the chord track is not strictly mandatory, however strongly recommended to make the most of your Woovebox' capabilities; not in the least because it is a very quick, easy and versatile way of creating a professional sounding song. As you get to know your Woovebox better, you are encouraged to learn more about chords and how to relate to music production on your Woovebox.
You don't need to know any music theory however, to start using the chord track; all its functions work just as well if you play or produce music solely "by ear". If you are new to music production, then all you need to know is that a chord progression (cycling between two or more chords) tells a story; it creates tension and resolution over time, creating a strong interest and evoking emotions with your audience. The sort of story you want to tell and the types of emotions (happy, sad, mysterious, etc.) you wish to evoke, are controllable by the chord types, as well as the key your song is in. Many pop songs use 4 chords, some use only 2. There are no set rules, however there are some guidelines that may help.
Like the BPM (tempo) setting, the chords that are playing, flow through to many other aspects, from the way your bass lines and arpeggios play, to sound design and chord lock effects.
Set the root note and scale (optional)
If scales and keys are not something you wish to bother with at this time, it is enough to know for now that your song will be in the C major/A minor key by default (e.g. if you imagine a piano keyboard, all "good sounding" notes will be the white notes). If, however, you wish to set up a custom scale/key for your song, you can do so through the following;
- Switch to Song mode (hold value knob and short-press 16/A8/SONG).
- The root note can be set by changing the parameter under key 2/bs. Changing the parameter works in exactly the same way we changed the song's tempo (BPM); hold the key, and turn the value knob.
- The scale or mode can be set by changing the parameter under key 3/Ld.
For an in-depth look at scales and modes, and how they relate to music production on your Woovebox, please see the scales and modes section.
Program a chord progression
Just like we did for the kick drum, make sure you are on the "sequencer" ("SEq") page of the chord track. Switching between tracks will usually keep the page you are on the same. So if you were on the "sequencer" page for the kick drum track, switching to the chord track will also immediately put you on the "sequencer" page for the chord track.
The chord track is the only "special" track that works a little different to all the other (2/bs-16/A8) tracks. Whereas you normally record single notes, hits or sample triggers to all the other tracks, the chord track records chords (e.g. multiple notes at once that sound harmonically interesting). The chord track is the only track that is truly polyphonic, meaning it is the only track that can play multiple, complex voices at the same time (your Woovebox is also capable of reproducing some limited paraphonic sounds/chords on the other tracks however).
Unique to the chord track, rather than single notes, two sets ("types") of 7 chords are laid out across the 1-16 keys;
- Press key 1, 2, 3, (but not 4/CdLo), 5, 6, 7, 8 to hear the seven different chords at your disposal for chord type 1.
- Press key 9, 10, 11, (but not 12/CdHi), 13, 14, 15, 16 to hear the seven different chords at your disposal for chord type 2.
- Holding key 4/CdHi or 12/CdLo while turning the value knob to cycle through the different types of chords available for chord type 1 and 2 respectively.

Get a feel for how the chords work and sound, and how you can cycle through the different types. Doing so, you may already find a chord progression (say a sequence of four chords) you really like. And of course, select a different preset if you don't like the timbre.
For your convenience (or if you are not that familiar with the different types of chords and how they sound), the chord track's two sets of chord types start off in "diatonic" ("diat tri" and "diat 7th") types (unless you are using a more exotic key/scale that does not permit this). Without delving too deeply into music theory, it is enough to know that the seven diatonic chords from the harmonic foundation of Western music, provide the basis for creating progressions and harmonies that sound cohesive within your song's chosen key/scale. Or in other words, just playing key 1, 2, 3, (but not 4), 5, 6, 7, and 8, you will notice that you can construct most popular chord progressions with just those seven keys!
As with our kick drum track, the pattern starts off empty. So playing the pattern back will not produce any chord sounds yet; let's change that. Assuming you wish to program a 4-chord progression;
- Play (choose) your first chord.
- Hold write and short-press key 1. The chord you played is now programmed to play when the play head encounters step 1; the LED at step 1 is now lit up.
- Play your second chord.
- Hold write and short-press key 5.
- Play your third chord.
- Hold write and short-press key 9.
- Play your fourth chord.
- Hold write and short-press key 13.
Just like with the kick drum track, if you made a mistake and wish to delete a chord from a step, simply hold write and short-press the key corresponding to the step you wish to clear. You may also edit one or multiple programmed steps in-depth by holding a step, but let's keep things simple for now.
And just with the kick drum track (or any track for that matter!), if you cannot find immediately find a chord progression you like, you can also have your Woovebox generate a random one for you; on the "SEq" page choose and action the "rand Pttn" context menu option.
Once you have your chord progression entered, press play to hear your chord progression being played back to you. Press play again to stop the playback. You will once again notice that pressing play caused your song to be automatically saved.
You may also have noticed that, by default, the chord track steps through its programmed steps four times as slow as the other tracks. That's because the BPM divisor (b.div under 1/Cd on the Pttn page) for its patterns defaults to 4. You are, of course, free to change this as you please.
Program a bassline
Switch to the bass track (2/bS) and use the value knob to scroll to the "GLob" page. Press key 4 to verify the state of the "FLW.C" ("FLLW Chrd") parameter is set to "root". If it is not set to "root", change it to "root" by holding down key 4 and turning the value knob.
We just made sure that any bass notes that we will be programming, will be adapted to the chord being played. Specifically, any bass notes we will be programming, will be automatically transposed to the nearest root note of the chord that is being played (other adaptations are also available).
We can verify this behavior by scrolling to the sequencer ("Seq") page and playing the currently selected bass patch by pressing the 1-16 keys. You should hear the bass keeps playing the same note, with only the octave changing at most. The screen verifies this as well; you should see the same note being played, with only the number (indicating the octave) changing.
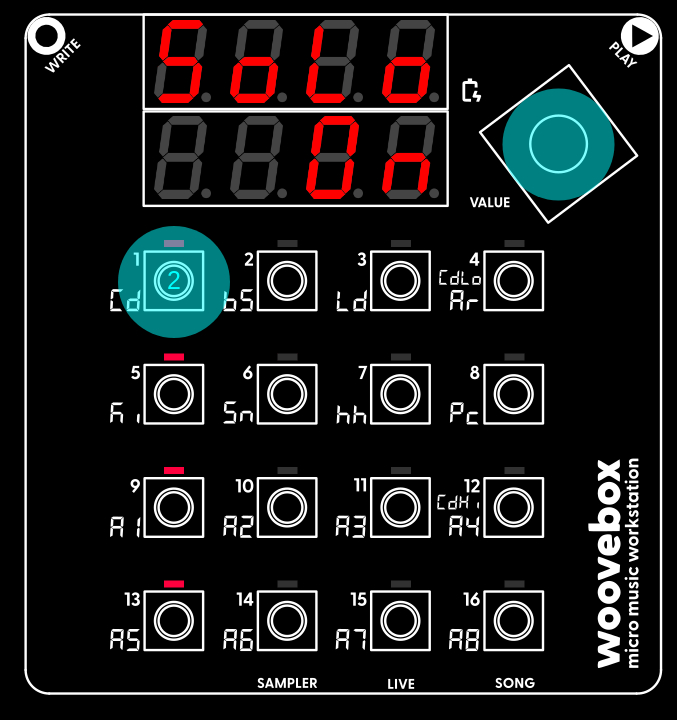
You may also notice the chord track faintly playing in the background every time you hit a bass note on the 1-16 keys. It is playing the last played chord and helps with giving you some harmonic context when programming more complex patterns or chains of patterns. If you wish to just hear the bass by itself, you can solo a track by "switching" to the track you are already on. In other words, hold value and short-press the 2/bS track (since we're currently on the bS track). The screen will display "SoLo On". Perform the action again to cancel the soloing ("SoLo Off").
Program some notes like we did for the kick drum. If you don't have anything particular in mind, even some random locations will do to get you started. Thanks to the "FLW.C" "root" setting, your Woovebox will transpose the notes to always "sound good".
And just like on the kick drum and chord tracks, the "rand Pttn" option is available in the "SEq" page's context menu if you need inspiration.
Once you have some bass notes, hit play. You will now notice how the bassline is automatically adapted to the chord that is playing. Indeed, if you now went back to the chord track and completely changed the chords, the bassline will still sound "good" and coherent. Your Woovebox is able to do this with all parts; basslines, melodies, arpeggios etc. It is even able to pitch-quantize LFOs. It is one of the reasons why creating complex songs and sounds on the Woovebox is so quick and immediately rewarding.
Program an arpeggio
Switch to the arpeggio (4/Ar) track and use the value knob to scroll to the "Glob" page. Press key 4 to verify the state of the "FLW.C" ("FLLW CHRD") parameter is set to "CLS.A". If it is not set to "CLS.A", change it to "CLS.A" by holding down key 4 and turning the value knob.
Similar to what we did to the bassline, we just made sure that any arpeggio track notes will be adapted to the chord being played. However rather than adapting the notes to the root note of the playing chord, the notes will be "pulled" to the closest note that the chord consists of.
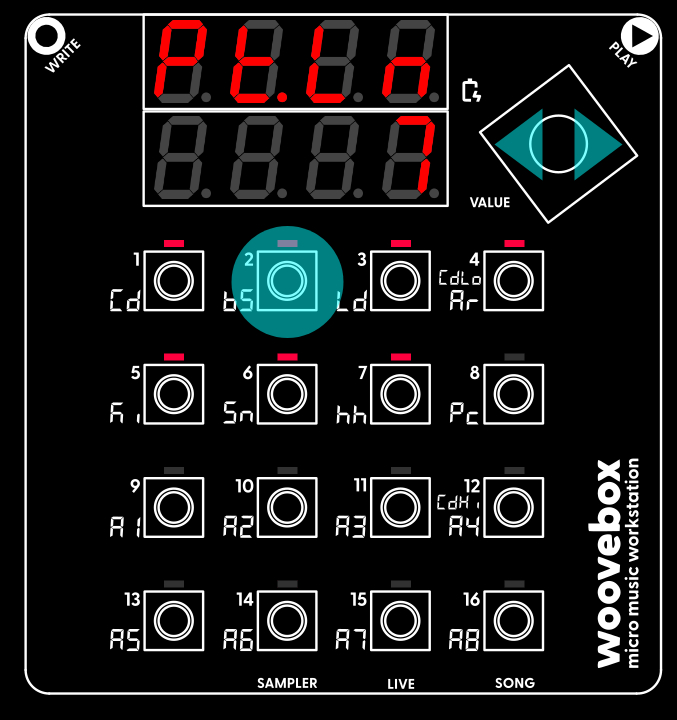
Arpeggios are short runs and are typically not as long as full patterns (e.g. they are typically not as long as, say, our bassline pattern). Use the value knob to scroll to the "Pttn" page. Change the "Pt.Ln" ("Ptrn Len" / pattern length) parameter under the 2 key. It is likely set to 16 (playing all of the 16 steps of the pattern). However, for an arpeggio, typically short runs are more suitable. Set "Pt.Ln" to, for example, 5 or 7.
Switch to the Sequencer page (use the value knob to scroll to it, or use the shortcut by pressing the value knob). Press play. You should now see the play head cycle between the first few steps, rather than all 16 for this track.
All we need to do now, is add some notes. Again, some random notes will do for now if you wish. You will notice you are not able to program notes past the reduced pattern length; the device will respond with ("Chng Len"; aka "please change pattern length first!").
Press play to hear your newly created arpeggio. Once again you will notice the arpeggio is automatically adapted to the chord being played.
Feel free to experiment with different lengths. You will likely notice that prime numbered lengths (for example lengths of 3, 5, 7 or 11) produce the most interesting, intricate and complex arpeggio runs (think IDM, Trance), while numbers that are divisible by two or three (2, 4, 6, 8, 9, 10, 12 etc.) sound more conventional (think 80s pop, Synthwave).
Arpeggio tracks are perfect for conditional triggering and modification, allowing you to create incredibly intricate arpeggiated runs.
Build up your song with more elements

Now that you have familiarized with programming notes and patterns, you can start building up your track.
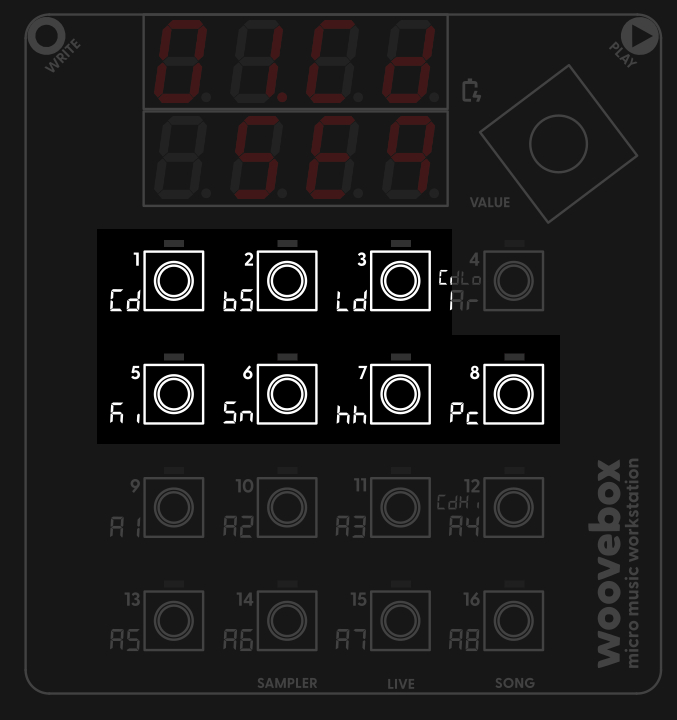
For example, put a hi-hat (7/hh) on the off-beat (steps 3, 7, 11, 15) add a snare (6/Sn) or clap on steps 5 and 13.
Editing an event in detail
An essential part of creating patterns and songs on your Woovebox that sound polished, is conditional triggering and modification.
As the name implies, conditional triggering and modification allows you to trigger and modify notes and samples under certain conditions.
Using conditional triggering and modification, you can create complex, changing patterns from just 16 steps that keep your listener's interest. Some common examples include;
- Complex arpeggios
- Drum fills
- Hi-hat ratchets
- Snare rolls
- Bass or lead slides
- Crash cymbal triggering on every nth pattern playthrough
- Note pitch changes
To demonstrate, let's add a crash cymbal that only plays once every 4 pattern playthroughs on the 'Pc' ("percussion") track;
Switch to the 'Pc' track by holding the value knob and pressing 8/Pc, and select the 'Seq' page.
By default, the 'Pc' track should be initialized with a crash cymbal (you can of course also select something else from the 'Pach' preset page).
Just like programming the other tracks, audition the note or slice you wish to use, and then hold write and press key 1-16 corresponding to the step you wish to program the note or slice on. Usually a crash cymbal sounds on the first beat, so let's program it onto step 1.
Editing an event in detail
Keep holding the write button (or if you already let get, hold the step you just programmed until it starts blinking). While the step is blinking, press the value knob to cycle through the various step parameters you can change. Here you can change things like note pitch ("note"), velocity ("VELo"), length ("LEn"), micro-timing/shift ("ShFt") and various other things depending on the type of track and its specified behavior. Change a parameter's value/selection by turning the value knob.
The two parameters that are relevant to conditional triggering are 'when' and 'do'.
The 'when' parameter specifies the condition that needs to be satisfied. By default that condition is 'awys' (always), meaning that your Woovebox will always trigger the step. For our crash cymbal we would like the 'when' condition to something that only triggers once every four playthroughs. With the 'when' parameter selected, turn the value knob until you have found the '1of4' condition.
You can now let go of the step and/or write button you were holding. Press play to hear the crash cymbal play just once and remain silent for the following three other playthroughs.
You are, of course, not just limited to simple "yes/no" playback triggering. The 'do' parameter allows for a great number of modifications that can be made conditionally. We won't list them all here, however it is useful to note that there are generally two versions of each conditional modification. The ones with a dot at the end (for example "SldE." vs "SldE") won't playback at all unless the condition is met. The ones without the dot at the end will play back normally if the condition is not met, and will play back the step modified if the condition is met.
Chaining patterns
The Woovebox is all about "doing more with less". As such you are highly encouraged to prioritize creating variation through chord sequences, conditionals and using Song mode, rather than using more patterns.
However, in cases where a single 16-step pattern is too limiting (for example if you wish to record a long solo or melody), you can chain up to 16 patterns to create longer patterns, up to one long sequence of 256 steps per track.
You can change the current pattern by holding play and pressing 1-16 to change to pattern 1-16.
To chain the current pattern to another, use the value knob to switch to the "Pattern" ("Pttn") page. Change the "Chain next" ("Ch.ne") parameter under the 3/Ld key to reflect the pattern number that should play next after the current pattern. "SELF" means that the next pattern to be played should be the current pattern itself, which is the default behavior.
If you wish to repeat a pattern in a chain a few times before it switches to the next pattern, you can specify how many times the pattern should be repeated by changing the "chain repeat" ("Ch.rP") parameter under the 4/Ar key to reflect the amount of times you wish to loop the pattern before it switches to the next.
Via the context menu on the pattern ("Pttn") page of every track, you can also automate all this using the "Chn" item. While holding write (and before actioning the item), you can use turning of the value knob to choose how many patterns you wish to chain. This "sub-option" selection mechanic is used for various context menu items. Items that have sub-options, show a quick "running" light, indicating you can use the value knob for more sub-options.
Keyboard octave and transposing tracks
Many producers can struggle with melodies and motifs. This can particularly be the case, if playing a keyboard or music theory is not your forte.
Many instruments and grooveboxes offer scale-dependent keyboard layouts. This makes sure that whichever note you strike always sounds "good" in the context of the song that is playing. So does your Woovebox;
- Switch to the lead (3/Ld) track.
- Scroll to the 'GLob' page.
- Press key 4 to verify set the state of the "FLW.C" ("FLLW Chrd") is set to "LGL" or modify the setting so that it is.
- Switch back to the "Seq" page.
- Press play.
Now jam along with your song. You will notice whichever key you strike tends to sound "good" in the context of the song. That is because "FLLW Chrd" is set to allow all "legal" notes that the key/scale permits. This helps you play "in key" no matter what.
However, your Woovebox can take this one step further and assist with finding melodies and motifs even quicker;
Because it knows which chords are playing at which moment in time, the device can dynamically modify the keyboard to play different notes at different times in your song's playback when you press them. It can do so in a way that fits the chord that is currently playing. To engage this mode, set "FLW.C" one of the "trs" modes.
This opens up a new way of playing and improvising melodies; improvisation and playing becomes rhythm and timing-based rather than having to know and anticipate the chords that are playing. Indeed, it is possible to create a complex melody from an "island" of just a few 1-16 keys. A very welcome bonus is that this way of playing is uniquely suited to live playing a small device like the Woovebox with just a few buttons.
To get a feel for how this works, set FLW.C to one of the "trS" modes, and then keep playing the same one or two (or more) keys while playing back your song. Find keys that sound good to you. As soon as the chord changes, you should notice the keys playing entirely different notes that similarly also tend to sound "good".
Keyboard octave and transposing tracks
To change the octave of the 1-16 keyboard as you play it, hold write, then also hold play and turn the value knob to change octaves up or down.
All tracks can also be transposed any number of semitones. So if you feel any track or instrument sounds better in your song at a lower or higher octave after recording/programing it, simply transpose the track by 12 semitones up or down. You can do so by scrolling to the the 'GLob' page, and changing the 'trSP' parameter under the 2/bS key; e.g. hold down key 2/bs key and turn the value knob left or right (note that you can instead also change any programmed notes individually to play at a lower octave, or use the coarse detune setting for the oscillators - 3/Ld/'det.C' on the 'Osc1'/'Osc2' pages - to play an octave lower).
Recording live
If you have found a melody and wish to record it live while playing, rather than programming the notes, you can do so.
There are two live recording modes available; overdub ("dub") and punch in/out ("pnch")
- Overdub keeps any steps intact as the playhead moves over them, only erasing previous step entries if they are being replaced.
- Punch in/out starts erasing every step the playhead moves over, but only starts doing that once your play the first note ("punch in"). It is particularly useful for re-doing takes or portions thereof.
To start recording, hold write and short-press play for overdub mode. Still holding write, short-press play once more for punch in/out mode. As soon as you let go of write, a count-in starts. After the count-in, your Woovebox will start playing the current pattern chain, and any keys you press will be recorded to the nearest available step.
While recording, pressing play stops the recording behavior (but not the playback). Pressing play a second time will stop the playback as normal.
By default micro timing is recorded along with your performance. So if you were a little late or early, this is recorded for each recorded step. You can manually adjust the micro timing (shift/"shft" parameter when editing an event). In order to adjust timing while recording or after recording, you may also;
- Add "groove" non-destructive swing or progressive quantization to steps (9/A1/"Grve" on a track's GLob page)
- Engage auto-quantize while live recording (hold write, then long-press play to toggle it on or off)
- Apply "destructive" quantization ("qant pttn") via the Sequencer ("SEq") page's context menu
The payoff - creating a song with Song mode
The entire Woovebox workflow is centered around full song production; the device comes with a powerful dedicated Song mode where everything comes together. Learning how to use Song mode is key to getting the most out of your Woovebox and is key for the device to "click".
Learning the Woovebox, you should endeavor to move on from just playing simple loops in track editing/sequencer mode as soon as possible.
Song mode is so powerful (and rewarding to use!), that even with just a single 16-step pattern per track, you can create an entire compelling song that keeps the listener's attention start-to-finish.
Once you have created one or more patterns, elements and motifs across multiple tracks, you can sequence build-ups of these by mixing and matching them over time in Song mode (hold value knob and short-press 16/Song).
Once in Song mode ("SG.xx"), turn the value knob to the right until the screen reads "Fr.01". You can now create and edit the first "fragment" (fragment 01) of your song. If your screen happens to read "DJ.01" instead of "Fr.01", you are editing the DJ FX for that fragment. In that case, "switch" to Song mode once more (e.g. hold value knob and short-press 16/Song) to toggle between fragment editing mode and DJ FX editing mode.
When your song plays, the Woovebox steps through a number of sections ("fragments"). Fragments have a length (specify length by holding write and turning value knob) for which they play and/or effect the tracks you specify. No length (e.g. length equals zero) and no tracks enabled (e.g. all LEDs are off), means that song playback should end at that fragment ("End").
For example, to start fragment 01 off with the kickdrum and the bassline, hold write and short-press 5/Ki and then, while still holding write, short-press 2/bS.
The kick and bass tracks now light up, indicating that they will play for the duration of this fragment. You have just started your first song. On the next fragment you could, for example have your hi-hats come in. On the next, your arpeggio. On the next your lead, etc.
Much like editing steps on tracks, in a Song mode fragment, you can hold an active (e.g. "lit up") track and edit a number of settings. These settings include;
- The pattern ("Pttn") number that the track should play (note that pattern chains and playthroughs are still respected!)
- Behavior ("Behv") (play, mute, fade in/out, and various filter, pitch, and gater effects)
- Chord lock ("CdLk") determines whether the track should respond to chord changes
- Retrigger Pattern ("retr.Pt") applies a special step retriggering pattern, allowing for retrigger-based variations - useful for fills and stutters or more radical transformations of notes
Use the context menu to insert, delete or clone fragments.
You can even apply advanced DJ effects, or dynamically record the playing fragment to a buffer, which you can then start looping in subsequent fragments.
TIP: To work on individual tracks with a fragment's configuration (e.g. your selection of mutes and pattern numbers for the different tracks) intact, hold value and long-press to switch to any track. This lets you tweak parts of your song as it is played by a fragment. Note that this mechanic also works from Live mode, where this can be used to quickly mute different tracks.
More
This short tutorial only scratches the surface of your Woovebox' capabilities. Please see the rest of the support and documentation to get to know your Woovebox, sound design, mastering and music production. Enjoy!
You may also be interested in...
- Terms, Conditions and Warranty (under Shop)
- Looking after your Woovebox (under Guides, tutorials and docs)
Don't use any sharp tools or any abrasives on your Woovebox.
- i-bVII-bVI-V ("Andalusian Cadence") (under Popular chords)
You can press the 2/bs for A minor, 1/Cd for G major, 8/Pc for F major, and 7/hh key for E major.
- Song mode (under Guides, tutorials and docs)
"Song mode" allows you to create and arrange complete, complex songs, rather than just more basic individual patterns or loops.
- Cleaning and restoring the enclosure (under Looking after your Woovebox)
The "OG" Woovebox enclosures and screen surrounds are SLA 3D printed using a resin that has a deep black appearance.
- Guides, tutorials and docs
- Learning the Woovebox
- The very basics
- Quick start tutorial and video
- Tempo and BPM
- Tracks
- Patterns
- Live pattern recording
- Conditional triggering and modification
- Chords
- Arpeggios
- Scales and modes
- Genres
- Patches and Presets
- Sound design
- Paraphonic parts
- Multi-instrument mode
- Risers, fallers, sweeps & ear candy
- Live mode
- Song mode
- Full song writing
- Sampler & vocoder
- Sidechaining, gating, ducking and compression
- Mastering
- Lo-fi & vintage analog and digital emulation
- Randomization
- Hall effect sensor playing
- Advanced techniques
- Undo
- Boot modes
- MIDI, Sync and connecting other gear
- Remote control expander mode
- Wireless MIDI over Bluetooth
- Battery and charging
- Hardware quirks and limitations
- Understanding DSP load
- Looking after your Woovebox
- Firmware updates