The very basics
- Guides, tutorials and docs
- The very basics
- Guides, tutorials and docs
- Learning the Woovebox
- The very basics
- Quick start tutorial and video
- Tempo and BPM
- Tracks
- Patterns
- Live pattern recording
- Conditional triggering and modification
- Chords
- Arpeggios
- Scales and modes
- Genres
- Patches and Presets
- Sound design
- Paraphonic parts
- Multi-instrument mode
- Risers, fallers, sweeps & ear candy
- Live mode
- Song mode
- Full song writing
- Sampler & vocoder
- Sidechaining, gating, ducking and compression
- Mastering
- Lo-fi & vintage analog and digital emulation
- Randomization
- Hall effect sensor playing
- Advanced techniques
- Undo
- Boot modes
- MIDI, Sync and connecting other gear
- Remote control expander mode
- Wireless MIDI over Bluetooth
- Battery and charging
- Hardware quirks and limitations
- Understanding DSP load
- Looking after your Woovebox
- Firmware updates
No patience? Just take note of the following, and you may well be able to figure out your Woovebox on your own.
Booting up

Switch on your Woovebox without touching the write or play touch buttons (as their sensitivity is calibrated during power-on). A short wake-up sequence follows.
The length of the full boot sequence may vary depending on the amount of housekeeping your device needs to do, but should be in the range of ~2 seconds for normal operation. Boot-up after a firmware update/reset may take longer. In longer cases (up to 2 minutes), the letters "W O O V E B O X" will scroll past until the device is done.
A number of special boot modes are available by holding special 1-16 key combinations during power-on; please see "boot modes".
Basic interface navigation
Physical controls
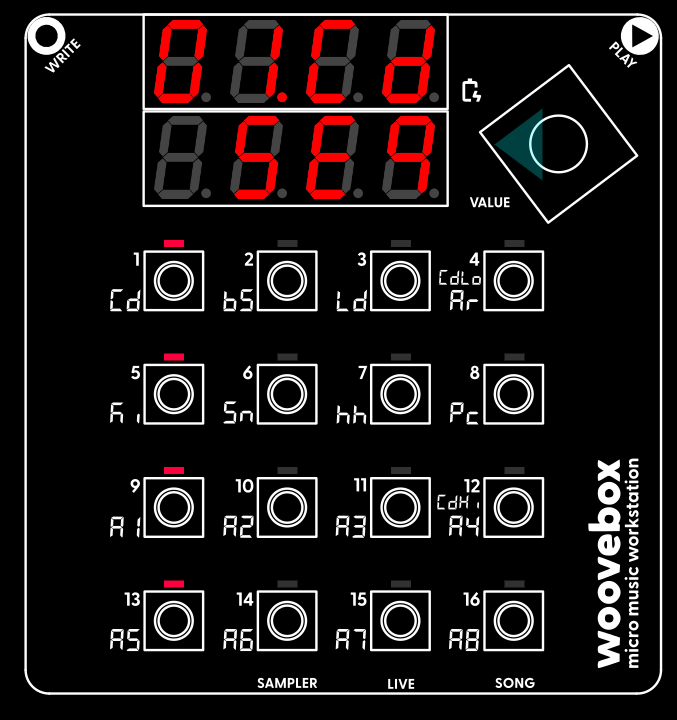
Your Woovebox comes with 19 pressable buttons;
- 16 keys labelled 1-16
- a value knob that can be turned, as well as pressed in
- two touch-sensitive shoulder buttons/areas labelled write and play.
The value knob
The value knob is an infinite rotary encoder and can be turned left or right. The speed with which you turn the knob often has an effect on how quickly a value, setting, or page selection changes. This allows for very fine control by turning slowly, and fast, coarse control by turning quickly.
However, when using the value knob to set values on the different track pages (hold 1-16 corresponding to the parameter you want to change, and turn the value knob), it can be quicker and less tiresome to instead hold 1-16 corresponding to the parameter you want to change, hold the value knob pressed in, and then turn. This will skip much larger values without having to turn fast.
The write and play capacitive shoulder touch buttons
The write and play buttons are touch-sensitive (capacitive) areas. They are located at the top left and right edge of your Woovebox respectively. These buttons take the form of touch sensitive areas on the surface of your Woovebox.
Touch sensitivity of these buttons is re-calibrated every time you turn on your Woovebox. Therefore, please make sure you are not touching these buttons at that time.
The write and play touch buttons are calibrated to require full, deliberate covering of the entire area by a finger or thumb. Partial touches or coverings are likely to be rejected. In the case of the play button, if using your thumb, having your thumb along side the base of the encoder, touching it, is a good guide.
If, despite these tips, you find the capactive play and write buttons do not reliably register your touch (for example, because your have very dry fingers/thumbs or because you have callused fingers/thumbs), you can boot (e.g. turn on) the device while holding 6/Sn to make the buttons more sensitive.
Long presses and short presses
To access some functions or behaviors, a distinction exists between how long you press a button. A short press is performed by holding down a button no longer than one second, while a long press is performed by holding down a button longer than one second.
Button combinations
The Woovebox is a small device and some functions require a combination of two controls to be used. The amount of button combinations used are, however, kept to a minimum and are used in the same way across the UI. For example, changing a parameter usually requires holding down one of the 1-16 keys while turning the value knob.
4x4 LED grid
The 4x4 LED grid (in the form of LEDs placed above each of the 1-16 keys) indicates different aspects, depending on the mode or page you are on. The LEDs may indicate that notes are assigned to steps 1-16 (on the 'Seq' page), that presets are available (on the 'PAch' page), or may in other cases indicate that a parameter may be accessed by holding down the 1-16 key and turning the value knob.
When playing back a pattern or song, a virtual "playhead" (blinking LED) runs from left to right, top to bottom to indicate the step being played.
Context menu
A menu with context-specific options to what you are doing (can be mode or page dependent) is available, by holding write for the duration you wish to use the menu, and short pressing the value knob. Short pressing the value knob again (while still holding write) will cycle to the next item in the menu. To action a menu item you selected, perform a long press on the value knob.
Some context menu options have sub-items or parameters you can select. Such items will show a short "running light" indicator. Turning the value knob allows for selection of the sub-items or for setting the parameter.
Accessing extra / advanced options like this through the context menu, is a universal mechanic throughout the Woovebox interface.
Behavior and location consistency
You do not have to memorize endless obscure button combinations to get around your Woovebox. Neither is there much menu-diving involved. Helpfully, similar functions or parameters tend to use similar locations, layouts or control combinations.
Some examples;
- Setting a step length ("note duration"), whether it is in Track edit mode, Song mode, or in the Sampler, is done through holding write and turning the value knob.
- Editing the two oscillators per voice (the "Osc1" and "Osc2" Track pages), identical 1-16 locations for each parameter are used.
- When editing LFOs, the waveform ("wave") is always selected using the "first" (1, 5, 9, 13) column, depth ("dpth") always selected using the "second" (2, 6, 10, 14) column, rate ("rate") is always selected using the "third" column (3, 7, 11, 15), and hold ("hold") is always selected using the fourth column.
- Modification, deletion or transformation of notes and samples (either one-by-one or multi-select), generally involves the write button.
- Non-destructive gestures (e.g. selection of patterns, songs, sample kits, playing things) usually involve the play button.
Auto-save
Any modifications you made are automatically saved when;
- Playback starts.
or
- When 8 seconds have elapsed, during which no other modifications were made.
Any previous save state is moved up to become the "undo" state. This "undo" state can be recalled by actioning the "undo" context menu item, which appears in the Song mode's "GLob" page (the same page the device drops you in upon boot).
Please do not turn off your Woovebox when an auto save is scheduled. To force-save, simply press play. In the unlikely event a song is mid-save while power is lost, there is a small chance a song may get corrupted. You can recover the previous save state by using the "undo" state mechanic described above.
Auto-save can be turned off with a special boot mode (see boot modes).
16 x 16 x 16 x 16
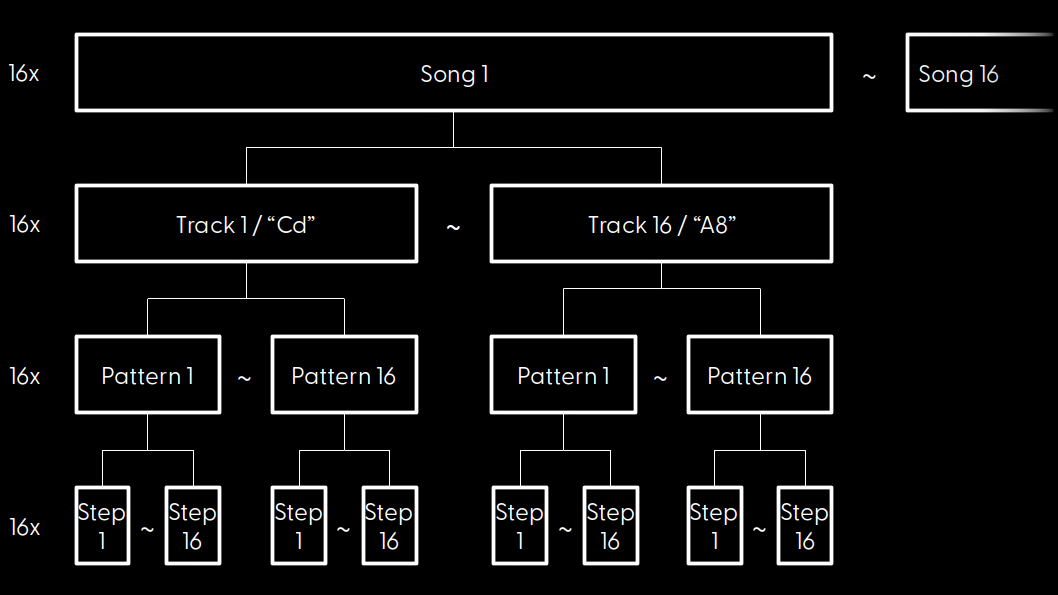
Your Woovebox holds 16 songs. Each song has 16 tracks. Each track has 16 patterns. Each pattern is made up of 16 steps.
While just 16 patterns x 16 steps (= 256 steps max.) for each track per song seems very limiting at first glance, you will quickly come to learn that what appears to be a limitation, is actually one of the Woovebox' core strengths.
That is because, amazingly, even just a single 16-step pattern for each track is enough to create a full, complex-sounding song; it is very important to take note of how the Woovebox, contrary to many other grooveboxes, gives you 16 individual patterns per track. Many other devices swap this, and often give you a number of tracks per pattern. This pattern independence from the tracks, allows you to mix and match what your tracks are playing in your final song independently.
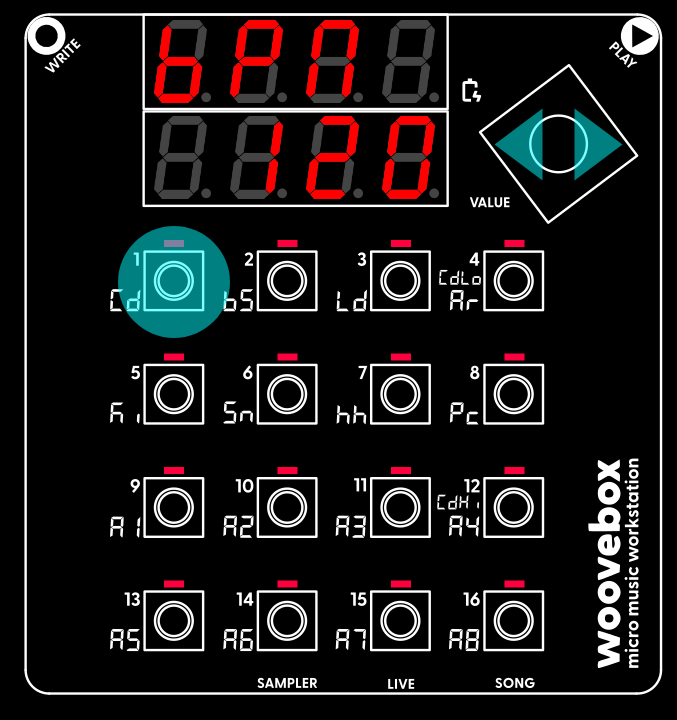
Songs

Once the device has booted up, it will start you off in Song Mode ("SG") with the last used song loaded ("01"-"16"). Song Mode is where you can select the song you wish to work on, where you can change global settings specific to the song (such as tempo, or multi-FX settings), transfer songs into and out of your Woovebox, and arrange songs by chaining patterns. You can always return to this mode by holding down the value button and then performing a short press (a short tap) on the 16/A8/Song key.
Your Woovebox can hold 16 user songs to work on. To select a song to work on, hold play and press 1-16 to select Song 1-16. The song number you selected will be reflected in the top display.
Before you continue, you may wish to change the volume in your headphones to a comfortable level. To do so, hold play and turn the value knob. This level is remembered next time you turn on your Woovebox. Playing the "keyboard" by pressing 1-16 will sound the instrument of the last track selected at different pitches. If you just booted up the device, this track will be the chord ("Cd") track by default.
If the song you selected is not empty, you can press play to hear the song being played back as it was arranged. Though this Getting Started guide will not go into arranging song fragments just yet, turning the value knob to the right (without holding anything else down), will let you start arranging the song, cycling through song fragments. Turning the value knob to the left (again, without holding anything else down), will ultimately return you to the global song settings we started off at.
Tracks
Your Woovebox allows you to work with 16 tracks per song. A track can be thought of as a member of a band or orchestra. This "member" will be in charge of one of 16 instruments/synthesizers (for example a bass or synthesizer lead), or in charge of a sample kit (for example a drum kit, or a number of pre-defined vocal chant samples, etc.). With one exception, all tracks are monophonic (meaning they can only sound one note at a time) or paraphonic (meaning they can sound multiple notes at a time, starting at the same time).
The one exception is the chord ("Cd") track. It is the only track that is 4-voice polyphonic, allowing for complex chords. The 16 tracks of your Woovebox are helpfully labeled on the front of the device, to the left to each 1-16 key. Their fixed designations are;
- "Cd" / "chord"; must be used for chord progressions, and is the only track that is 4-voice polyphonic
- "bs" / "bass"; suggested use for basslines
- "Ld" / "lead"; suggested use for lead melodies
- "Ar" / "arpeggio"; suggested use for arpeggios
- "Ki" / "kick"; suggested use for synthesized kickdrums
- "Sn" / "snare"; suggested use for synthesized snares
- "hh" / "hi-hat"; suggested use for synthesized hi-hats
- "Pc" / "percussion"; suggested use for general percussion such as a crash cymbal or synthesized clap
- "A1" / "all-purpose/auxiliary 1"; anything extra you might need in your song
- "A2" / "all-purpose/auxiliary 2"; anything extra you might need in your song
- "A3" / "all-purpose/auxiliary 3"; anything extra you might need in your song
- "A4" / "all-purpose/auxiliary 4"; anything extra you might need in your song
- "A5" / "all-purpose/auxiliary 5"; anything extra you might need in your song
- "A6" / "all-purpose/auxiliary 6"; anything extra you might need in your song
- "A7" / "all-purpose/auxiliary 7"; anything extra you might need in your song
- "A8" / "all-purpose/auxiliary 8"; anything extra you might need in your song
With the exception of the Cd track, all tracks are interchangeable and their behavior or role in your song can be re-assigned. Or in other words, the designations for all tracks (except Cd) are merely "serving suggestions"; you do not have to put a hi-hat on the hh track if you don't want to, and you can reconfigure the track's behavior if needed. So, if you wish, you can put a bass or arpeggio on the hh track instead.
Selecting track 1 through 16 (Cd through A8) for editing, is done by holding down the value knob and performing a long press on the desired button corresponding to the track. Alternatively, for selecting track 1 through 13 (Cd through A5) a short press can be used as well (note that a short press on A6, A7, or A8 invokes the Sampler, Live Mode or Song Mode respectively, rather than switching to the A6/A7/A8 tracks, therefore A6/A7/A8 are only accessible via a long-press).
Tracks may be configured to play real-time synthesized sounds, play samples, modify incoming audio, modify the delay buffers, or may be silent altogether (for example when driving other external music gear through MIDI).
Tracks may also be configured to follow the playing chord ("Cd" track) chord, or adapt to the chosen key/scale.
Lastly, please note that DSP resource limitations may start to apply if A6, A7 and A8 have audio playing at the same time as Cd through A5.
Pages
Each track has multiple pages, where different aspects of the track can be modified. These pages are accessed by turning the value knob left or right. Turning the value knob to the right will scroll through the other pages, covering everything from sound design to side chaining and patch presets.
Sequencer
The "left-most" page is always the Sequencer ("Seq") page, where you can edit the steps of the currently selected pattern. This is the most important page where a pattern's steps can be modified in detail. This page shows which steps currently have notes assigned to them via the LED grid, whereas most other pages show which 1-16 buttons have parameters behind them that you can modify.
Note that in pages other than the Sequencer ("Seq") pages, holding down write temporarily reveals which steps currently have notes assigned to them, as if you were on the Sequencer ("Seq") page. Letting go of write will once again show which 1-16 buttons have parameters behind them that you can modify.
Patch (and selecting presets)
The "right-most" page is the Patch ("Pach") page, where you can select preset patches and - through the context menu - perform things like backing up patches, or copying them to other tracks.
Holding any button with lit up LED and then turning the value knob, will load a preset. Note that you can, for example, load a Ki (kick category) patch onto, say your 3/Ld/Lead track if you so wish.
Auditioning
Where applicable, pressing the 1-16 buttons will sound the instrument of the current (or last) selected track. For example, if the current (or last) selected track was the lead (Ld) track, pressing 1-16 will allow you to play the lead sound. You can audition tracks like this in track editing mode, as well as in Song mode.
However, note that there is a subtle, but important difference in the way the sound is triggered, depending on what you are editing in the interface. The difference is the following;
- If you are on the Sequencer page ("Seq") of a track, notes will sound immediately as soon as you press 1-16. As soon as you release the pressed 1-16 key, the note will stop sounding. This behavior is much like pressing the key on a piano, and is the best way to jam along with your song or come up with riffs, melodies and motifs. This behavior is also identical to playing in Live mode.
- Everywhere else, notes will only sound once you release (let go) of 1-16, and will play for the duration of the programming note length (set by holding write and turning the value knob). This behavior may feel "laggy" when trying to jam along with your composition, but is useful when combined with changing parameters when, for example, sound designing a patch. Note also, that if you have the programming note length set to "0.St" (zero length), then any patch that has an attack and decay level of 0 will not sound anything at all (as the step/note length is applied to the sustain component only).
TIP: While editing a track, you can quickly switch between the Sequencer page ("Seq") and another page by pressing the value knob.
Patterns
If a Track is the member of a band or orchestra, then a pattern is a page of sheet music that each member is reading. Each track can play up to 16 unique patterns, and patterns may be chained if needed. A pattern itself is made up of a maximum of 16 steps. When a pattern plays (press the play button to start or stop playing), each track steps through these steps
While playing, you will see a blinking "play head" to indicate the position, running from left to right, top to bottom. As your Woovebox steps through the pattern, any steps that the play head encounters that contain notes (lit up) are played. Any steps that do not contain a note (not lit up) are ignored at that moment in time.
By default most tracks step through their patterns at a speed of 16 steps (e.g. 4 beats, or one bar) per pattern. The overall speed is determined by the "BPM" setting in the Song settings. However it is possible to modify this speed (see "b.div"/"BPM div" parameter on the "Pttn" page) on a per-pattern basis.
Note that, by default, the Chord track is the only exception; the default settings cause the pattern to be stepped through at a slower pace (there "b.div"/"BPM div" is set to divisor of 4 instead of 1, so that a a pattern now takes 4x as long to be stepped through, compared to the other tracks.
It is also possible to change the length of a pattern to something smaller than 16 steps (see "Pt.Ln"/"Ptrn Len" parameter) on a per-pattern basis. Changing the length of a pattern can create complex and interesting sounding polymeters, and can even allow for different time signatures within one song.
At first glance, 16 patterns with only 16 steps each per track may appear to be extremely limiting. However, as you will discover, the Woovebox is all about doing more with less; your device comes with a vast arsenal to quickly transform riffs and motifs into complex and interesting arrangements. In fact, it is possible (and common) to create full, complex sounding songs with just one pattern per track.
As opposed to many other grooveboxes, patterns (and their chains) should be considered to be living mostly in isolation until they are mixed and matched in Song (fragments) or Live (scenes) mode.
Steps
Programming notes into steps
Play the note you wish to record and let it go, then hold write. If you are not on the Sequencer ("Seq") page of the track, the LED grid will change temporarily to show the steps as if you were on the Sequencer ("Seq") page until you let go of the Write again. Now press 1-16 to put the note you played into step 1-16
You can set multiple steps this way to the same note, as long as you hold write. Any step you program will blink for the duration you hold write.
Note that you can further make already existing steps with notes blink as well. As long as you are holding write, any steps that are blinking can be edited in more detail; while still holding Write, press the Value button to cycle through a number of editable step attributes. The attributes can, while still holding the write key, be modified by turning the value knob. For non-chord tracks (e.g. anything that is not the "Cd" track) the editable attributes are;
- 'Note'; the pitch at which the note or sample should play.
- 'SlcE'; slice - the slice number 1-16 of a sample kit. Note that this option is only available if "bEhv"/"trak BEhv" (Track Behavior) on the track's "Glob" page is set to "SmPK" (sample kit).
- 'LEn'; length - the length of the note in steps.
- 'VELo'; velocity - how loud the note should play. Default velocities are 100 out of 127, where 0 is silent.
- 'WhEn'; when - a condition that needs to be met before this step plays.
- 'do'; do - a special way the note or slice should be played when the 'WhEn' condition is met.
- 'ShFt'; shift - a micro-timing value from 0 to 99, indicating how late the note should play from 0 (no shift) to 99 (nearly at the same time next step begins), with 50 being right in between the current step and next step.
For the "Cd" track-only, the editable attributes are;
- 'Root'; the chord's root note
- 'LEn'; the length of the chord in steps.
- 'VELo'; velocity - how loud the chord should play. Default velocities are 100 out of 127, where 0 is completely silent.
- 'Chrd'; chord - the type of chord
- 'Inv'; inversion - what, if any, chord inversion should be played
- 'ShFt'; shift - a micro-timing value from 0 to 99, indicating how late the note should play from 0 (no shift) to 99 (can be considered playing the next note "early"), with 50 being right in between the current note and next note.
Modifying one or more steps
On the Sequencer ("Seq") page of the track, hold the step you wish to modify until it starts to blink. While still holding the step, press the Value button to cycle through a number of editable step attributes. The attributes can, while still holding the write key, be modified by turning the value knob.
It is also possible to select multiple steps for modification; while still holding the first step, hold Write, then let go of the step; the step will keep blinking. The interface will now behave as if you just programmed a new note, and any other steps can be selected via the same mechanism under "Programming notes into steps".
Note once again that modifying steps this way only works on the Sequencer ("Seq") page of the track; selection on other track pages is not possible.
Deleting notes from steps
To delete a step's note, hold write and press 1-16 for any step that has a note assigned to it (e.g. is lit up).The step will no longer be lit and the note data for this step erased. You can do this for multiple steps for the duration you hold write.
Real-time recording notes to steps
It is possible to real-time record a performance into the Woovebox. Simply hold the write button and press play to start recording.
The recording will be automatically quantized, meaning the notes you play will be automatically "pulled" towards the nearest step so that minor timing issues in your playing are eliminated.
Regular step editing is also still available during playback and recording, so notes recorded in real-time can be edited in real-time as well. Note that note modification (through holding the Write key) will cause the current pattern to loop, allowing you to better gauge the modifications you made in context of the entire pattern being played across all tracks.
TIP: You can chain multiple patterns together with "ch.ne"/"chn.next" parameter to record more than 16 steps at once.
Changing a setting or parameter
Your Woovebox is a deeply powerful device with many settings, controls and parameters for you to tweak.
Each 1-16 key corresponds to one of sixteen parameters, controls or settings. As such, you can access up to sixteen parameters, controls or settings at once (e.g. per page).
The nature and amount of parameters accessible to you, depend on the mode (Track, Sampler, Live, Song) and the selected page ("GLob", "Osc1", "Osc2", etc.). For example, a track's "GLob" (for Global) page gives you access to 16 parameters, all pertaining to the currently selected track.
Not all pages have 16 parameters; on most pages, a 1-16 key that has an accessible parameter underneath, has its corresponding LED lit up.
- To learn the current value of a setting, control or parameter, simply perform a short-press on 1-16. For example, while in Song mode and on the "GLob" page, pressing 1/Cd will show you the current tempo in Beats Per Minute (BPM).
- To get a longer eight-character description of the parameter, perform a long-press on 1-16.
- To change a parameter or setting, hold down 1-16 and turn the Value knob left or right.
In most modes and on most mode pages, short-pressing 1-16 will also audition the currently active track as soon as you let go of 1-16. This will quickly help you determine how your parameter tweak may have changed the sound. If this is undesirable, perform a long-press on 1-16, waiting until the eight-character description comes up. Then tweak your parameter after the eight-character description has come up, to avoid auditioning the sound.
Workflow and Song Mode
Generally, a workflow will look like;
- Select a song to work on
- Select a track to work on
- Select a pattern to work on
- Record, edit notes
- Audition your track's pattern, in the context of other patterns, in the context of a live performance (in live mode), or in the context of your song (in song mode)
- Go to 2
Once you are happy with your individual patterns on their individual tracks, you should ideally create full songs out of them by creating "fragments" out of them in song mode, or create "scenes" out of them in live mode for live performances. Getting to grips with Song mode in particular, is key to getting the most out of your Woovebox.
Finally, you can export any songs (but not individual patterns) you made as .WAV audio files and .MID MIDI files via Wooveconnect.
Refer to the quick start tutorial for a super quick introduction to making your first song. It is highly recommended to go through the tutorial at least once.
You may also be interested in...
- Resources, videos & downloads
- 8. FL.En Filter End (under DJ page)
- 6/Sn Increase capacitive button sensitivity (under Boot modes)
- 4/Ar + value Factory reset (under Boot modes)
- 13/A5 Demo mode; disable song restore & autosave (under Boot modes)
- Guides, tutorials and docs
- Learning the Woovebox
- The very basics
- Quick start tutorial and video
- Tempo and BPM
- Tracks
- Patterns
- Live pattern recording
- Conditional triggering and modification
- Chords
- Arpeggios
- Scales and modes
- Genres
- Patches and Presets
- Sound design
- Paraphonic parts
- Multi-instrument mode
- Risers, fallers, sweeps & ear candy
- Live mode
- Song mode
- Full song writing
- Sampler & vocoder
- Sidechaining, gating, ducking and compression
- Mastering
- Lo-fi & vintage analog and digital emulation
- Randomization
- Hall effect sensor playing
- Advanced techniques
- Undo
- Boot modes
- MIDI, Sync and connecting other gear
- Remote control expander mode
- Wireless MIDI over Bluetooth
- Battery and charging
- Hardware quirks and limitations
- Understanding DSP load
- Looking after your Woovebox
- Firmware updates